

Overview
Products and Prices are core resources within Clink that define what you sell and how much you charge for it. These entities integrate seamlessly with subscriptions, invoices, and checkout sessions.Product Management
Access your product list through the Products tab.Creating a Product
To create a new product:Add a Product
Add a Product
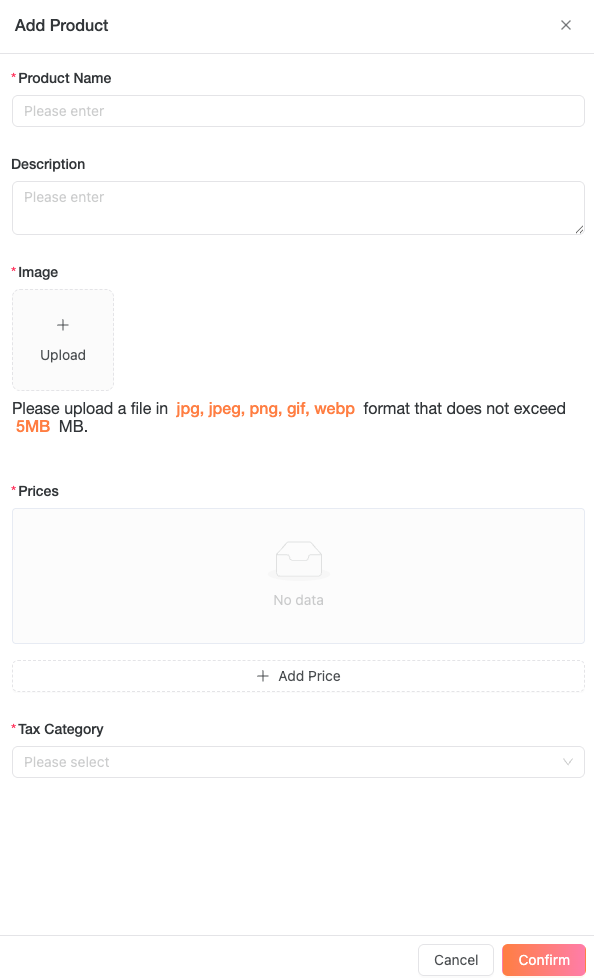
- Navigate to the Products tab and click Add
- Enter the product name and upload a product image
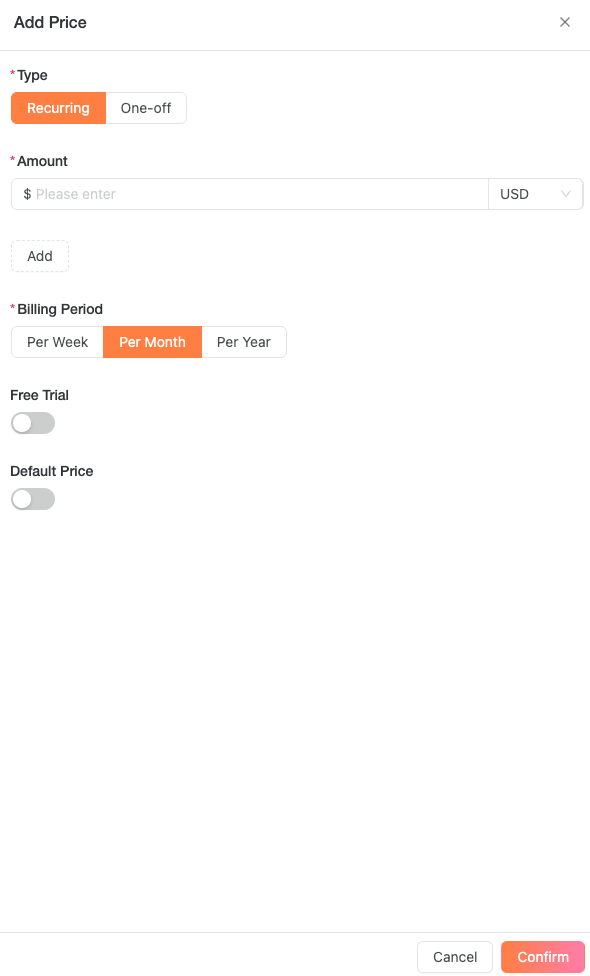
- Click Add Price to set pricing options:
- Choose between Recurring or One-off price types
- For recurring prices, select a Billing Period (Daily, Weekly, Monthly, Quarterly, Half-yearly, Yearly, or Custom)
- Optionally enable Free Trial and specify the trial duration
- Set as Default Price if desired
- Add additional pricing tiers as needed
Add a Price
Add a Price
- Select the appropriate Tax Category from the dropdown menu
Create Products by API
You can upload a product image with the Upload Product Image API before creating a product. The API returns anossId that you pass as image when calling Create Product API.
You can also create products through the Create Product API. The API supports creating a product together with its prices and accepts localized product names through localizedNames.
Use localized names when you want checkout and billing surfaces to display a customer-facing product name in different languages. The default name remains the fallback value.
Editing Products
To modify an existing product:- Go to the Products tab
- Find the product you want to edit
- Click the Edit button
- Make your changes
- Click Confirm to save
Archiving Products
When you archive a product, it becomes unavailable for new subscriptions while existing subscriptions remain active until canceled. To archive a product:- Navigate to the Products tab
- Locate the target product
- Click Archive and confirm in the popup window
Price Management
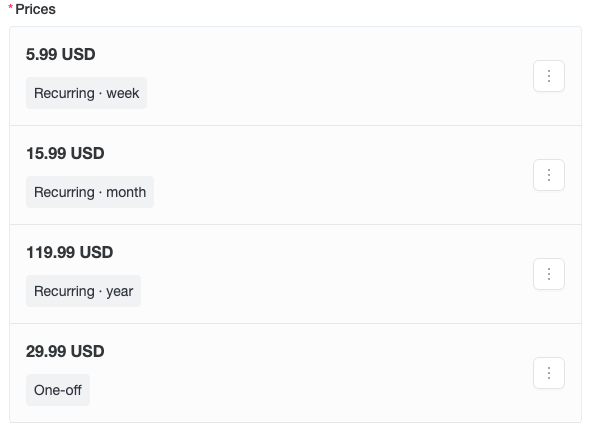
Products can have single or multiple pricing options, combining both recurring and one-off prices. For example: A starter plan could offer:- $5.99 weekly
- $39.99 quarterly
- $69.99 half-yearly
- $15.99 monthly
- $119.99 yearly
- $29.99 one-time purchase
day, week, month, quarter, half_year, year, and custom. For custom intervals, use interval_count to define the number of days in the billing cycle.
Multi-currency Pricing
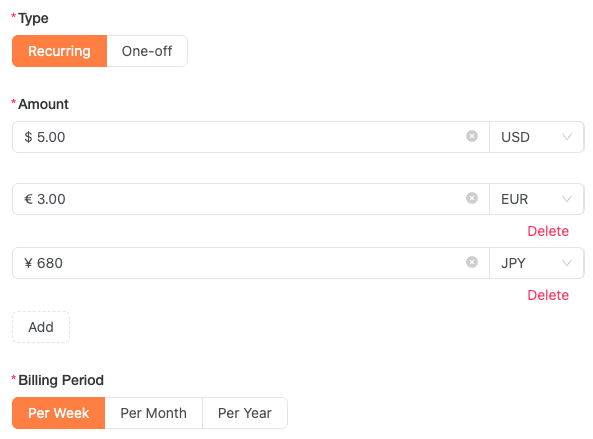
Multi-currency pricing allows you to set localized prices for different markets using a single price configuration (only one price ID). For example:- Default price: $5.00 USD per week
- European price: €3.00 EUR per week
- Japanese price: ¥680 JPY per week
Automatic Currency Conversion
For One-off prices without specific multi-currency settings, Clink automatically offers local currency options to international customers during checkout.Edit Price
Price changes in Clink are managed through a snapshot system. While merchants cannot view or edit these snapshots directly, each price update creates a new snapshot. Here’s how price changes affect your subscriptions or one-time sales:- New subscriptions and purchases will use the updated price
- Existing subscriptions will continue with their original price until canceled
- Price history is maintained automatically through snapshots
priceSnapshotId, which is the currently active snapshot for that price. Product API responses also include priceSnapshotId on each item in priceList. Use this snapshot ID when another API needs an immutable price reference, such as scheduled subscription phases.
To edit a price:
- Navigate to the Products tab and locate your target product
- Expand the price list using the arrow on the left, or click the Edit button
- Find the price you want to update and click its overflow menu button (⋮)
- Select Edit from the menu
- Make your desired changes on the edit page
- Click Confirm to save your changes